Sorry it took so long to get these photographed, but I was waiting for some snow so I could get a decent background for them. Ofcourse, we're in the darkest time of the year where we hardly got any daylight, so even though the pictures look crappy and dark, it was the best I could produce for you guys at this point.
I've said so much about these mittens allready, so I'll spare you more details and rambling and fuming about them. If you're new to my blog and want to read about them, then go back in my blog to the older blogposts, I've written ALOT about them.
And yes, I have been thinking about taking on Elsa's gloves as well. I am currently researching them, but for now, I don't have anything to show you guys from it yet though, and I do not know when (or if) I will be making them.
Showing posts with label frozen. Show all posts
Saturday, January 11, 2014
Anna's mittens - finished and now photographed!
Tuesday, January 7, 2014
Anna's mittens - done with the felting!
Sorry for leaving the few of you whom actually are genuinely following along and reads my blog hanging, but I took a nap shortly after the washer was finished and I took the stuff out...so I kinda forgot blogging about the mittens. They turned out decent enough, so you don't have to worry about me putting a gun to my head.
As some of you might have noticed, I posted a video earlier where I checked in on the felting. That was a little over half way through the program, everything looked good in the washer, everything was going smoothly and they weren't ruined yet, so I let them go until the program was over.
When the machine stopped and I pulled them out though, they didn't turn out like I wanted to, but they're way better than I'd imagined!
Yes the diamond snowflakes are too big and placed too far up on the mittens, but the felting made them look much better than they did before!
The mittens them selfs have a kinda short in the hand and they're a bit roomy around the wrists so it will probably take a long time to get them worn in and soft...as it is will all felted knitwork. They're thick and warm and I think I have enough room inside them for a pair of gloves too.
What do you think about the result? I will have to do a little photoshoot when they're all dry and finished, so better pictures, as well as pictures on deviantART will come soon enough!
Oh! And I also felted the ugly slippers I made before Christmas that turned out too big. After the second felting they're perfect! They're thicker, smaller and I bet they'll also be warmer! Might need to make another pair to document every step on the way here so I can write the pattern down properly. It is based of a different pattern with personal changes so I can't take full credit on it.
Labels:
anna mittens,
anna's mittens,
felt,
felted,
felting,
finished felting,
frozen,
mittens,
slippers
Anna mittens - Moment of truth!
Oh my god I don't think I've ever been this scared of felting since I made that Sunny Duckworth sitting cushion...which was also the last item I ever stitched an image unto...and then felted afterwards... Now, it went well, but some places didn't get felted enough, but that's cause the stitches were too close and too many at certain parts...
So now is truly the moment of truth for the Anna mittens. I just weaved in the last end and I'm about to throw them into the washer on 40'C for felting.
I am also going to throw in my slippers which I made just before Christmas that sadly turned out a tiny bit too big... Either I will ruin both of them, one of them or they will both turn out fine... I tell you, felting is SCARY!!!!
Now, you might be interested in how to felt in the washer so why not make a little step by step how I do it and blog it for you guys? Sure! Why the heck not! On to the washer we go!
First I wet the objects I am to felt...can't really remember if it's nessesary... Don't really care about what temperature that water has at this point, but it's just what I do... I sound SOOOO professional right now! I think it was to open the fibers so that the felting would start faster?
Then I put them in the washer along side a pair of jeans, you can also use towels. This is actually an old pair of mine whom I used so much that it started to get huge holes all over the place, they have now become my "felting jeans" and that is litterally their only purpose.
It's important to put something in with the objects you are felting because it causes friction and friction is one of the things that needs to happend for the felting to actually take place. You need heat and water, usually combined also known as hot water...either 40'C (104'C) or 60'C (140'F) if you're using a washer. If you're hand felting then you can just use as warm water you can manage. You will also need motion and friction. If you just put your object in hot water and let it sit for an hour, nothing will happend to it...except for getting wet... When you're handfelting you need to rub it against something or itself to get the felting started, this is where the jeans (or towels) come into the picture if you're felting in a washer.
Then I add a splash of green soap, you can also use a soap for wool or silk fabrics for a softer felting, but I prefer green soap myself...just what i grew up with when we felted in kindergarden, school and at home...cause we actually did alot of felting.
If you're nervous about leaving the machine on, then pause it frequently and check the result. When it's felted enough for your desire, stop it and rinse out the remaining soap. If you're too scared to use the washing machine, then felt by hand. The only downside to felting by hand (besides it takes forever and it's hard) is that the thing you're felting may get uneven felted. In a machine, the result get's alot more even and prettier.
Pepsi desided to join in on the action cause he's tired of being an adult and wants to shrink down to kitten size again...
Now. When you're finished felting, let it dry, but while it dries, you can shape it. Let's say you're making a pair of slippers, you can stretch them if they're a tad too small. You can give them the shape of a foot so that they're easier and more comfortable to use for the first time. I do not recomand flatten a pair of slippers down like a pair of socks and let them dry like that. They're horrible afterwards!
Got more felting questions? Leave them down below and I'll try to answer to the best of my ability! Wish me luck! I'll blog the results as soon as they're finished!
Labels:
anna mitten frozen,
anna mittens,
cat,
cat photobombing,
felted,
felting,
frozen,
frozen mittens,
kitten,
kitty,
knit,
knitted,
knitting,
pepsi,
wip
Todays progress - 7th jan
Another day full of crafting...or half of it atleast... Let's start with the Anna mittens!
I am closing in on finishing them, luckily, but there's still alot left. I did manage to finish of the diamond snowflake on the first mitten yesterday, and I'm almost halfway there on the second, but again I burned out and had to stop before I was going to kill someone. Also the fact that I managed to misplace one stitch on the first one are killing me, but I am NOT going to undo THAT much work, now way in hell! I got a feeling that these mittens are either going to make or break my day and my look at stitching + felting.
After I pulled out my UFO's which you can read about in the previous blog entry, I decided to pick up and hopefully finish the chair blankets for my mother. There was a few half done ones and a bunch that needed ends weaved in so I took care of that. After a recount I found out that I'm missing 12 squares before I can start to assemble them. I know there's one square missing in this picture, one fell out of the pile before I took the picture.
So yeah! Progress! I've been working on Anna's mittens for 4 days, I will get them finished this week. I have no idea about my other projects so we'll just have to see how things are progressing!
Labels:
afgan,
anna mitten frozen,
anna's mittens,
colors,
crochet,
frozen,
granny square blanket,
knit,
knitted,
knitting,
progress,
yarn
Monday, January 6, 2014
Yesterday's knitting progress - 5th jan
Not sure if I'll be able to keep up with all these "progress of the day" posts so I might end up do them like this...the next day. Then again, I might not do one of these every day. I should quit blabbering now and get on with it!
I finished one of the diamond snowflakes, so now I only have to do the whole thing over again on the other mitten. Not really looking forward too it, seing as it makes me go insane, but then again, I can't wait to see them finished and hopefully they will not get ruined during felting, cause then I would kill myself for sure...
Even though they're turning out to be my worst enemies right now (and I'm seeing now that I managed to missplace one of the stitches...ffffffffffff), I just love the design of this diamond snowflake so dang much! I fell in love with it and the mittens when I first saw the movie, hence why I'm now making them in real life. They are a bit missplaced compared to the one in the movie, but it was the only way it would look good cause of the round with increasing around the wrist area.
During my rage quit on these for a moment in the middle of the night, I actually started two other projects. One is a very unimportant one and just for inbetween stuff...even though I really should have been working on the granny squares for my mother's chair blankets, I started a simple granny square blanket with a bunch of yarn I don't really like using. Might give it to Pepsi if I ever finish it...though I might frog it down in a month cause I've forgotten about it. And yes, that is a Joker band aid... I cut myself while slicing a bun... Batman is freakin' awesome!
And the last project I started will most likely be another eternity project. I found this awesome FREE pattern on Ravelry the other day and I knew that I needed to make this for baby CarCar. Yes Carolyn, this is for your baby! It's a baby blanket! I dug out some yarn from my storage and hopefully I won't have to buy too much extra yarn to finish it up. I'm trying to use as much as possible from my storage, which means the main colors will be coconut grey (which is a beautiful color in my opinion) white and either green or red to spice it up a bit. It will also make it more or less gender neutral since it's too early to tell if baby CarCar will be a boy or a girl. It's not much too look at yet so don't freak out, Car...save it for when the fair-isle has started. I do not want to cut in my knitwork...cause I'm a wuss...so I'm knitting it double...not double knit, just double... I hope it won't get too bad...
Labels:
afgan,
anna,
anna's mittens,
baby carcar,
blanket,
blue,
carolyn,
diamond snowflake,
fair-isle,
frozen,
knit,
knitted,
knitting,
mitten,
progress
Tired of stitching...
I never learn. I haven't done this on many projects, but damn, I really should learn NOT to do this on future projects. My mind thinks that it saves time and yarn, but in reality it takes more yarn and more time...and more of my sanity...if I even have any left...
Sewing any kind of image, letters, decorations...what have you on any kind of knitwork (or crochet for that matter) is boring and it really takes forever. Since I'm not that good with sewing to begin with, it feels even more tedious and turns out even uglier than if I were good at it.
Except from doing the thumb, this is all progress I've done today...and that's saying something! I'm still on the first glove for Joe Pesci's sake! Please don't look too closely on the stitching... I know it's uneven and ugly... hopefully the felting will even it more out and hide the uglyness...
For being the first fresh project of the year, it sure is a nightmare. It is litterally giving me a headache and it's grumping me out...not to mention the lack of winter outside are making them kinda worthless and a waste of time... I need to start a different project before these end up in the blender...
Bottom line: no snow, no cold, Americans complaining about having "too much snow and cold" and a tedious project doesn't sit well with me when mixed...
Labels:
angry,
blue,
blues,
diamond snowflake,
frozen,
mitten,
pattern,
sad,
stitching,
sweing,
tedious project,
upset
More popular than my old blog!
Might just be a thing now in the beginning, but this blog has gathered more popularity, views and followers so much faster than my "main" blog. Only 6 days with active blogging and I've gained 222 pageviews, 7 followers and 6 comments overall on my 12 blogposts.
My other blog have been active for almost three years with only 21707 pageviews, 13 followers and 130 comments overall on my 157 blogpost. There's quite some difference there.
Now I've never been a popular blogger and I've never expected any popularity with my blogs, but this is making me quite happy, and if things keep going steady like this, this would make my most popular blog yet! But lets face it, that's never going to happend
And just to give this blogpost a picture like the rest of them, here's my progress on the mittens! This is taking forever! I hate stitching on patterns like this...
It doesn't look like much yet, but hopefully the result after felting will be awesome!
Sunday, January 5, 2014
Tutorial: How to make a thumb the simple way
As I said in my last post, I'm writing up a tutorial for you guys today! It might not be interesting at all for some of you, but as I said, it's ment for you beginners out there, dreading to make mittens for the first time. It's not hard at all!
Now, this thumb I am going to show you might not work for any kind of mitten pattern out there, but it's great if you're making mittens with a looser fit, all in ribbing or felted. Also, it's not as scary as making a thumb gusset, so if you're making a pair of mittens for your first time, this could be a good version to try.
I'm not going to tell you how to make the rest of the mitten, so I'm going to skip the cuff part...
Knit to where the the pattern tells you where the thumb will be...
Take a longer piece of scrap yarn in a contrasting color and start knitting the amount of stitches the pattern tells you to knit, for me it's 10 stitches on these mittens. I know this sounds scary, but just leave the thread you were originally knitting with. DO NOT BREAKE IT THOUGH!
When you've knitted all the stitches the pattern said (again, 10 stitches for me here), place them back on the left needle!
Pick up the strand you left back there and knit the stitches AGAIN, but now with the original yarn.
Make sure you got all the stitches, check it twice if nessesary. It should be the same amount of stitches as you knit with the scrap thread. In my example here, 10 stitches.
When you got them all on the needle too, it's time to remove the scrap yarn. I like to fish them out with a spare needle, but you can just as easily use a crochet hook or a sewing needle. Start in one end, hook the first stich and pull it out like this.
Continue like this, stitch for stitch until the thread is all out.
And presto, you got a hole!
Now it's time to start knitting. Start on the lowest needle. Check the stitches if they're right or twisted. If they are twisted then knit in the back loop of them all and they will automaticly turn right for the next round and you won't even see it on the final result.
Now, when you've knit all the stitches on the first needle, you'll notice that there's a huge gap before the second needle.
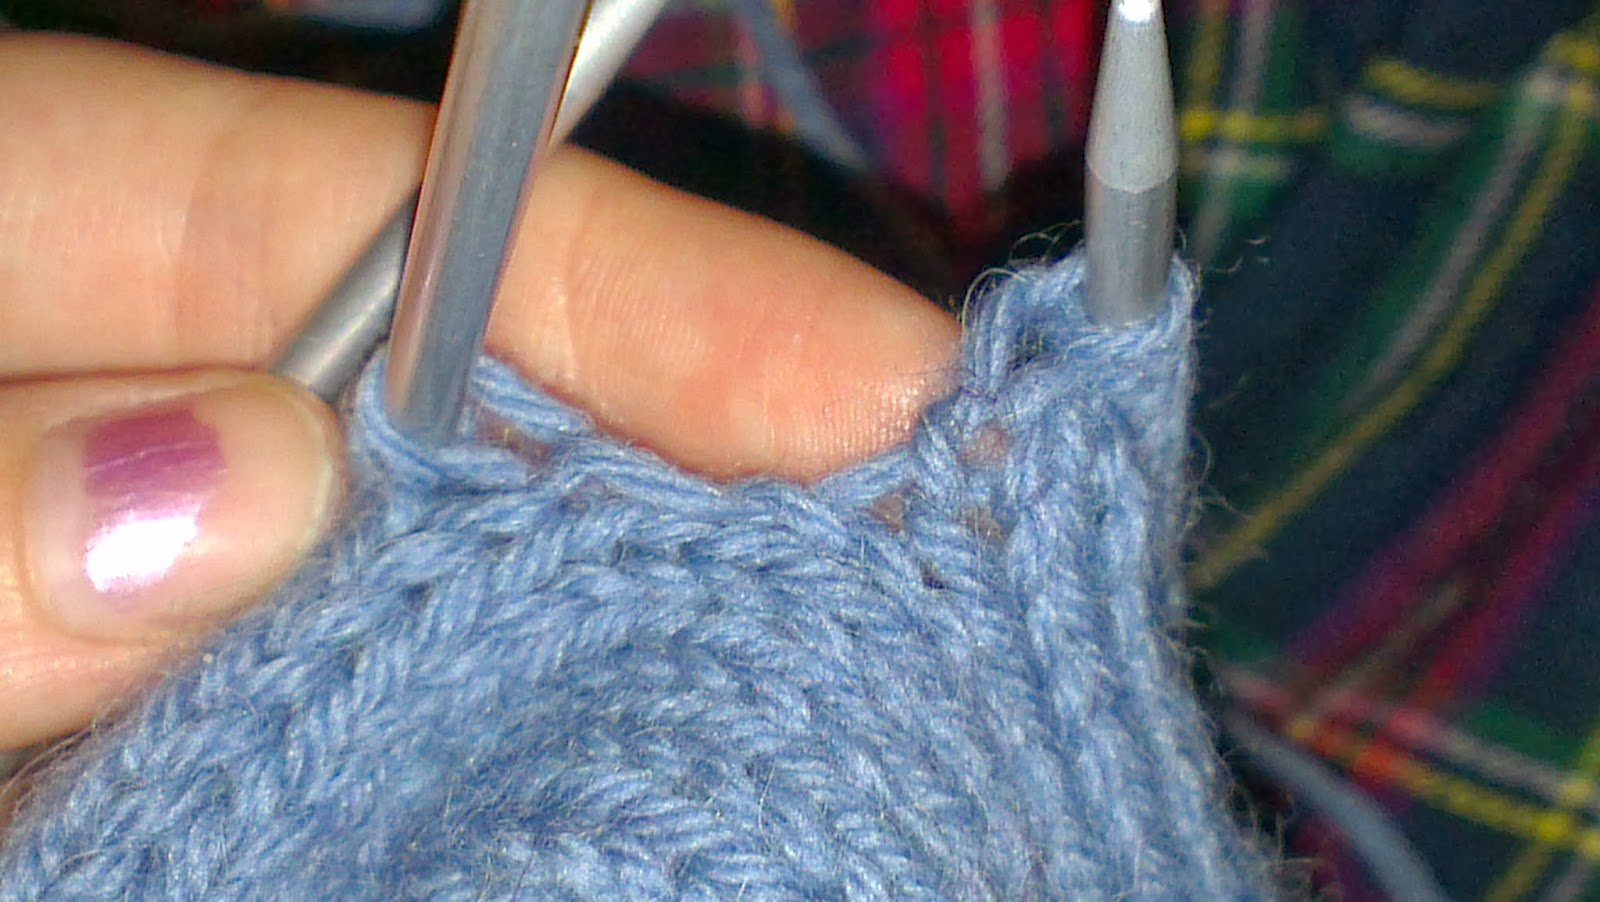
Usually the pattern tells you to pick up an extra stitch or two in each side, my pattern asked for one. But look here on the result after I picked up just one stitch...
Not that pretty, right? There's a trick that makes less holes when you're knitting like this. Instead of just picking up one, I'm picking up two stitches, but I knit them twisted together. I put my right needle through the back loop of both stitches I picked up and knit them together. The result are much better, just see for yourself!
Seeing as I'm going to felt these, that tiny hole you see there will not be visible at all, and really, on a normal, non felted pair of mittens, that wouldn't be noticed. It also looks more tidy than the picture where I only picked up one stitch.
Do the same in the other side and you got all your stitches you need on the needles. In my example here, it's 22 in total!
Knit the thumb to the desired lenght, measured from the inside of your own thumb, k2tog over all stitches on the last round, break yarn leaving a long end and pull it through the remaining stitches. And you're finished! Again...don't mind the size of these, they are going to be felted...as I've said a thousand times allready...
Now, this thumb I am going to show you might not work for any kind of mitten pattern out there, but it's great if you're making mittens with a looser fit, all in ribbing or felted. Also, it's not as scary as making a thumb gusset, so if you're making a pair of mittens for your first time, this could be a good version to try.
I'm not going to tell you how to make the rest of the mitten, so I'm going to skip the cuff part...
Knit to where the the pattern tells you where the thumb will be...
Take a longer piece of scrap yarn in a contrasting color and start knitting the amount of stitches the pattern tells you to knit, for me it's 10 stitches on these mittens. I know this sounds scary, but just leave the thread you were originally knitting with. DO NOT BREAKE IT THOUGH!
Pick up the strand you left back there and knit the stitches AGAIN, but now with the original yarn.
And you're done for now! Just finish the mitten and don't think anymore of the thumb for now.
Once the mitten is finished, the kinda tricky part comes, but really, it's just as easy as the earlier stages. Take one of your needles and pick up the stitches below the red thread. Just stick the needle through one of the sides of each stitch like this. Don't think about if you pick them up the right way or if they turn out twisted, it's easy to change that later on, just be sure to pick up them up from the same side of each stitch all the way.
Now it's time to do the same on the other side. This might be confusing, but the stitches are upside down, so you got to think a bit differently, but in the same way as before, pick up the stitches, one by one.
Continue like this, stitch for stitch until the thread is all out.
And presto, you got a hole!
Now it's time to start knitting. Start on the lowest needle. Check the stitches if they're right or twisted. If they are twisted then knit in the back loop of them all and they will automaticly turn right for the next round and you won't even see it on the final result.
Now, when you've knit all the stitches on the first needle, you'll notice that there's a huge gap before the second needle.
Usually the pattern tells you to pick up an extra stitch or two in each side, my pattern asked for one. But look here on the result after I picked up just one stitch...
Not that pretty, right? There's a trick that makes less holes when you're knitting like this. Instead of just picking up one, I'm picking up two stitches, but I knit them twisted together. I put my right needle through the back loop of both stitches I picked up and knit them together. The result are much better, just see for yourself!
Seeing as I'm going to felt these, that tiny hole you see there will not be visible at all, and really, on a normal, non felted pair of mittens, that wouldn't be noticed. It also looks more tidy than the picture where I only picked up one stitch.
Do the same in the other side and you got all your stitches you need on the needles. In my example here, it's 22 in total!
Knit the thumb to the desired lenght, measured from the inside of your own thumb, k2tog over all stitches on the last round, break yarn leaving a long end and pull it through the remaining stitches. And you're finished! Again...don't mind the size of these, they are going to be felted...as I've said a thousand times allready...
I hope you've enjoyed this small tutorial of mine, hopefully it wasn't too confusing for you. If you got any questions, leave them down below and I'll be happy to answer them!
...this was a very BLUE blogpost...
Subscribe to:
Posts (Atom)