Now, this thumb I am going to show you might not work for any kind of mitten pattern out there, but it's great if you're making mittens with a looser fit, all in ribbing or felted. Also, it's not as scary as making a thumb gusset, so if you're making a pair of mittens for your first time, this could be a good version to try.
I'm not going to tell you how to make the rest of the mitten, so I'm going to skip the cuff part...
Knit to where the the pattern tells you where the thumb will be...
Take a longer piece of scrap yarn in a contrasting color and start knitting the amount of stitches the pattern tells you to knit, for me it's 10 stitches on these mittens. I know this sounds scary, but just leave the thread you were originally knitting with. DO NOT BREAKE IT THOUGH!
Pick up the strand you left back there and knit the stitches AGAIN, but now with the original yarn.
And you're done for now! Just finish the mitten and don't think anymore of the thumb for now.
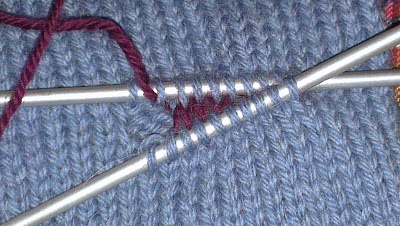
Once the mitten is finished, the kinda tricky part comes, but really, it's just as easy as the earlier stages. Take one of your needles and pick up the stitches below the red thread. Just stick the needle through one of the sides of each stitch like this. Don't think about if you pick them up the right way or if they turn out twisted, it's easy to change that later on, just be sure to pick up them up from the same side of each stitch all the way.
Now it's time to do the same on the other side. This might be confusing, but the stitches are upside down, so you got to think a bit differently, but in the same way as before, pick up the stitches, one by one.
Continue like this, stitch for stitch until the thread is all out.
And presto, you got a hole!
Now it's time to start knitting. Start on the lowest needle. Check the stitches if they're right or twisted. If they are twisted then knit in the back loop of them all and they will automaticly turn right for the next round and you won't even see it on the final result.
Now, when you've knit all the stitches on the first needle, you'll notice that there's a huge gap before the second needle.
Usually the pattern tells you to pick up an extra stitch or two in each side, my pattern asked for one. But look here on the result after I picked up just one stitch...
Not that pretty, right? There's a trick that makes less holes when you're knitting like this. Instead of just picking up one, I'm picking up two stitches, but I knit them twisted together. I put my right needle through the back loop of both stitches I picked up and knit them together. The result are much better, just see for yourself!
Seeing as I'm going to felt these, that tiny hole you see there will not be visible at all, and really, on a normal, non felted pair of mittens, that wouldn't be noticed. It also looks more tidy than the picture where I only picked up one stitch.
Do the same in the other side and you got all your stitches you need on the needles. In my example here, it's 22 in total!
Knit the thumb to the desired lenght, measured from the inside of your own thumb, k2tog over all stitches on the last round, break yarn leaving a long end and pull it through the remaining stitches. And you're finished! Again...don't mind the size of these, they are going to be felted...as I've said a thousand times allready...
I hope you've enjoyed this small tutorial of mine, hopefully it wasn't too confusing for you. If you got any questions, leave them down below and I'll be happy to answer them!
...this was a very BLUE blogpost...


Thanks for this! I'm gonna knit myself new mittens (not sure if it'll happen this winter though..) and this looks super easy! I've been quite intimidated by the thought, but this helps!
ReplyDeleteThank you! My work here is done then! Let me know how it goes ^^
Delete